CLICK HERE FOR FREE BLOGGER TEMPLATES, LINK BUTTONS AND MORE! »

Thursday, March 31, 2011

Practice Peasant/Prairie Dress

I made this dress for my daughter.  I called it my practice dress because I was hoping to make something similar for her for Easter.  But, I didn't want to mess up and chance wasting all the new springy fabric I had just bought, so I used some fabric I already had on hand and kind of whipped this up.

It's a combination of a peasant style top, apron prairie dress and tiered twirly skirt all put together.  This dress took me about a day and a half, but that's because I didn't have a pattern and was kind of winging it.  But I think it turned out looking pretty darn cute, if I do say so myself!

If I can manage to get my photos and notes in order, I just might have a tutorial to go with this too!


Sharing my creation at the following blogs:


Tip Junkie handmade projects

Saturday, March 26, 2011

Pirate Girl Skirt

My kids love that new show on Disney Junior, Jake and the Never Land Pirates.  My daughter especially loves that there is a girl pirate and has been dreaming of being a pirate for next Halloween.  But, after seeing this super simple tutorial over at Filth Wizardry, I knew I would have to get her exploring now with this adorable pirate skirt!
I started with 2 bandanas, that I purchased from Joann's.  I washed and air dried the bandanas, then ironed out the wrinkles.  I used a large plastic lid (about 5 inches wide) to draw a circle in the center of each bandana.
 

Next, I cut a line from the center of one of the sides to the circle, and cut out the circle.  Save those circles - you can put them to use later.
 

Then, I put the bandanas on top of one another right sides together, and stitched along one of the sides where I cut.  When you open them back up, you can see the skirt starting to form, with one side hem stitched and the other side hem still open.
 

I used one of my husband's old ribbed t-shirts and cut about 6 inches from the bottom.  This is going to make the waist.  I cut along the shirt's side hem so I had one long piece and not a tube, and started pinning it to the top part of the skirt, right sides together.  Then I ran a straight stitch.
 

I used the original hem from the bottom of the shirt to run my elastic through for the waist.  Once the elastic was in place, I folded the bandanas back over, right sides together, and ran a straight stitch on the other open side hem all the way up through the waist.

It looks so adorable and was so easy to make!  I used one of the extra circles of bandana fabric and appliqued it onto the front of a tank top.  I think we will try to make some pirate swords this weekend as well.  Please be sure to check out Filth Wizardry for her simple step by step tutorial, and make a pirate skirt for your own little swashbuckler!

Wednesday, March 23, 2011

Sew Along for Japan

We've all heard about the devastation in Japan.  Their losses are greater than what any of us can even imagine.  So, when an opportunity arises to do a little something, share our craftiness and make a difference for just one child, there is no question about participating.  When I saw this post in my Facebook newsfeed today, I knew it was something I wanted to do.  I've been itching to get my sewing machine back out, and what better reason than to lend a hand in helping others in need.

The sew along will take place March 28 - April 1 on the Living With Punks blog.  Each day a new detailed step will be shared so you can create the friends forever shirt for a child in Japan.  You can download the pattern and instructions, as well as see additional details HERE.

Are you up for the challenge?  Comment here on the blog or on my Facebook page to let us know you are participating.  Then check out Living With Punks for all the details and to grab a button to share this awesome initiative!


LivingwithPunks

Tuesday, March 22, 2011

Rainbow Stitching

In the craziness I like to call life, I ran out of time to show you the neat craft I did with my son's class for St. Patrick's Day.  It started with this rainbow of colorful yarn...


I originally saw this idea at Filth Wizardry to use that rubbery shelf liner as a sewing medium.  What a fantastic idea!  It works great for kids who are learning and practicing simple stitches.  I loved how she drew pictures on the shelf liner, and used the rainbow to fit in with our St. Patrick's Day craft.


The kids all worked really hard on this - boys and girls alike!  I cut out a cloud for the kids to stitch to one side of their rainbow and a pot for the other end.  They each got a few Rolos to add as gold to their pots also.  It ended up being a two day project but everyone was able to take home their beautiful rainbow, complete with pot of gold.


Here is my son's finished project!


Thursday, March 17, 2011

Leprechaun Tricks

So this morning, the kids woke up to find that not only did we NOT catch that tricky leprechaun, but that he played some tricks on us instead!

He popped open all our umbrellas and dumped out all our craft sticks.
I don't think he liked those traps we made.


He even pulled out our St. Patrick's Day books to read.


He put chocolate syrup on the kids toothbrushes!


He hung up one pair of shoes,
but not before tying green bows onto them.


And he stuffed another pair of shoes into a pair of boots,
and changed the plain laces to pretty green ribbons.


And boy did he make a mess!
Green yarn on the ceiling fan...


and green streamers over the sofa and chairs.


And, he made sure we were practing our letters.


The kids had so much fun with this little adventure this morning!  They even got to follow a trail of green coins to a special treasure of candy coins.  I heard that the leprechaun also snuck into my son's school things and left a bunch of confetti shamrocks in his school folder and lunch box!


Wednesday, March 16, 2011

Leprechaun Trap

Although St. Patrick's Day is one of the smaller holidays celebrated at our house, my kids still get excited about all the little happenings that take place that day.  To prepare for this fun day tomorrow the kids made leprechaun traps.

We used small craft sticks to create a box, then used larger colored craft sticks to make the top (because you know leprechauns like rainbows).  We used one additional stick to prop it up, so the leprechaun could venture into the trap to see the yummy "gold" fish left for him.  I wonder if we'll catch him?


Saturday, March 12, 2011

Planting Flowers

"Flowers always make people better, happier and more helpful; they are sunshine, food and medicine to the soul.”
Luther Burbank, botanist (1849-1926)


Did you know that today, March 12th, is National Plant a Flower Day?  Although it was a beautiful start to the weekend here in Maryland, it's still a tad too chilly to plant anything outdoors.  But I know that Spring is on it's way, so we decided to take advantage of this day to plant some flower seeds indoors.

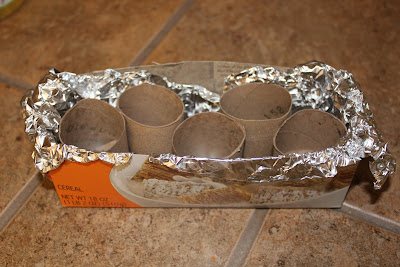
I like to do our part to recycle and reuse as much as possible, and our seed planting today gave us a good excuse.  We used some empty toilet paper rolls to create seed starting pods.  We started by cutting each roll in half, then cutting four slits on one end of each, to make tabs to fold over and create a bottom.  If you bend the tabs into the tube, then straighten them out to create the bottom they stay down, and the added soil will keep them in place as well.


Next, I cut the bottom from an empty cereal box to create a tray to hold our seed pots.  I lined it with aluminum foil so when there was water drainage, the box didn't fall apart.


We headed outside to gather some dirt to fill our seed pots, and found a few friends along the way.


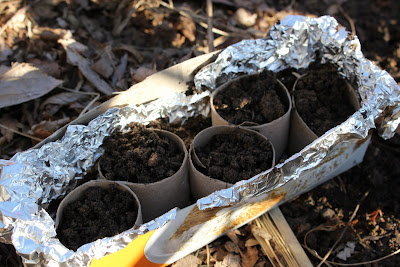
Then, we started planting our seeds.  My daughter used a small stick to make holes in each seed pot, then added a few seeds to each.


We watered our seeds with some water and plan to sit them in our front window for plenty of sun.


My daughter was pleased with her seed planting, choosing Zinnia, Morning Glory, Snapdragon, Daisy and Poppies to plant.  We even made plant markers with some craft sticks to keep track of the flowers.


Sharing at the following blogs:

Wednesday, March 9, 2011

Science Birthday Party

My son celebrated his 7th birthday last month, but because of our trip to Disney, we just had his birthday party this weekend.  He really loves Science, so he requested a Science party this year.  This was also the first year he had a party with just friends from school, so he was extra excited.

I was lucky enough to find this free printable science invitation over at Living Locurto - thanks Amy!


After mailing the invitations I started work right away on the cake, decorations, and party details.  For the cake, I ended up doing a two tier cake, covered in fondant and with lots of science details.  The colors were vibrant and the details turned out well.  Best of all, my son loved it!


For the decorations, we used a lot of my son's science things.  We filled some flasks with radioactive rods (aka glow sticks) and candy to match our cake colors (green, orange and blue).  We also filled his plastic test tubes with candy Nerds - they looked like some mysterious potions bubbling up.


We added his shark in a jar, shark teeth, and some of his favorite rocks from his rock collection to our display as well.


And, we made this banner reading, "Kaden's Lab," with paper plates linked together with pipe cleaners.


Each kid scientist who attended would receive their own clipboard with investigation sheets, a pair of goggles and a scientist badge.  I purchased the mini clipboards from Target for $1 each in the Dollar Bins and the plastic badge covers (10 pack) at the Dollar Store for $1.


As the kid scientists arrived, they used the hand scan to obtain access to the laboratory.  I saw this idea over at The Celebration Shoppe's blog.


We started our science party with a free exploration using magnets.  I filled a large container with some sand from our sand box and filled it with different metal items.  The kid scientists used magnets to find the hidden items and drew pictures of them on their investigation sheets.


Our second investigation was called Drops on a Penny.  The kid scientists made predictions about how many drops of water would fit on a penny, nickel, dime and quarter, then used pipettes to test their predictions and record their results on their investigation sheets.


Sink and Float was our third investigation.  Each kid scientist had a turn to pass an object around the table, then test it in the water to see if it would sink or float.  They recorded their predictions and results on their investigation sheets.


Our fourth investigation was Color Lab.  The kid scientists practiced mixing colors on their investigation sheets using colored water and pipettes.

\


The fifth investigation was creating constellations, using dark colored paper and star stickers.  We talked about what a constellation was and the kid scientists used their star stickers to create their own picture in the sky and used a piece of chalk to connect-the-stars to show their design.  I didn't catch a picture of this one.

The Milk Lab was our last investigation.  In a shallow dish, I poured some whole milk, then put drops of food coloring in a circle in the center of the dish.  I dipped a toothpick in some dish soap (we used Dawn) and placed it in the milk in the center of that circle of food coloring.  The reaction is really cool!  I purposely did not take a picture of the reaction, so you could be just as surprised when you try it yourself.  The kid scientists drew pictures on their investigation sheet to show what happened.


We had some basic snacks, drinks and food for the party.  We covered these mini water bottles with H2O labels that my husband made up.


We also had rainbow spectrum fruit strips (aka fruit roll ups), marshmallow molecules, cheddar explosion goldfish, and pretzel pinwheel atoms.  And of course there was every scientist's favorite fuel food - pizza!


All in all, I think the party turned out great!  The kid scientists seemed to have a lot of fun; even my son's teacher said that some of the kids wrote about the party in their journals Monday morning.  As a former teacher, I had fun too, getting back into teacher mode for a bit.


Many of our other Science items were purchased from American Science and Surplus.  If you haven't checked them out, you must!  

I don't believe I can share a link for my documents, but if you are interested in having a copy of any of the science investigation sheets or the kid scientist badges, just shoot me an email at themuddyprincess@gmail.com and I will email you the files.


Sharing this party on the following blogs:

Fireflies and Jellybeans          A Vision to Remember
Paisley Passions          Craft Envy
Yesterday on Tuesday          Funky Junk Interiors
What Allie's Making Now          Along for the Ride
Suzy's Artsy Craftsy Sitcom          Tatertots and Jello
Momnivore's Dilemma          While He Was Napping
733 A Creative Blog          Be Different Act Normal
Home Sweet Farm          Naturally Me Creations
Momma's Kinda Crafty          It's a Crafty Life
Fingerprints on the Fridge
Fun to Craft
Home is Where My Story Begins
A Little Knick Knack
Finding Fabulous
Lit and Laundry
Chic on a Shoestring Decorating
504 Main
The Shabby Nest
It's a Hodgepodge Life
Kojo Designs
A Few of My Favorite Things
Punkin Seed Productions
Antique Texan
Truly Lovely